
Cloud Control – Privilege Delegation – so you don´t have the oracle / root password?
By Martin | September 13th, 2017 | Category: Oracle Enterprise Manager, Uncategorized | No Comments »Quite frequently in database environments, security policies dictate that only personalized logons to Unix / Linux are allowed and that from there, one has to “sudo” to change to the oracle account. While this adds an additional layer of security, it makes administration a little more complicated.
Oracle Enterprise Manager – Cloud Control has a feature, which allows to cope with such a sudo environment. The feature is called “Privilege Delegation”. This post describes how to set it up and for what it can be used.
- Setup of “sudo” by the root account
- Setup of Privilege Delegation in Cloud Control
- The next step is to configure a Named Credential.
- Lastly, verify that it works as desired.
In order to use privilege delegation, specific sudo rules have to be defined. This rule normally already exists:
1 | mdecker ALL=(root) NOPASSWD:/bin/su - oracle |
In addition to this one, two additional rules are required. If only sudo to “oracle” is required, then only the first line is needed.
1 2 | mdecker ALL=(oracle) SETENV:/u01/app/oracle/cloud/agent/sbin/nmosudo * mdecker ALL=(root) SETENV:/u01/app/oracle/cloud/agent/sbin/nmosudo * |
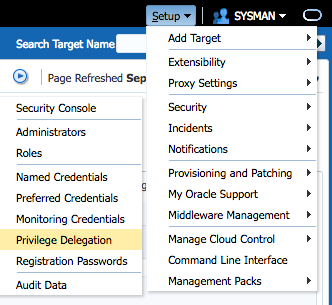
Go to Setup -> Security -> Privilege Delegation.
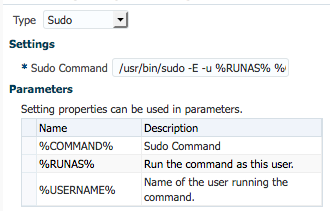
Then you can either set it globally via template or individually for each host. This depends mainly on the path to “sudo” binary in the operating system. Then you choose “sudo” and provide the path to the sudo binary on your operating system (bash$ which sudo). The required parameters are then appended: /usr/bin/sudo -E -u %RUNAS% %COMMAND%
If you are in a team of administrators, then each administrator should have his own account to log on to Cloud Contol and avoid using “sysman” user. For obvious reasons, each administrator has to create his own “named credential” (Setup->Security->Named Credential), because it contains his personalized username and password.
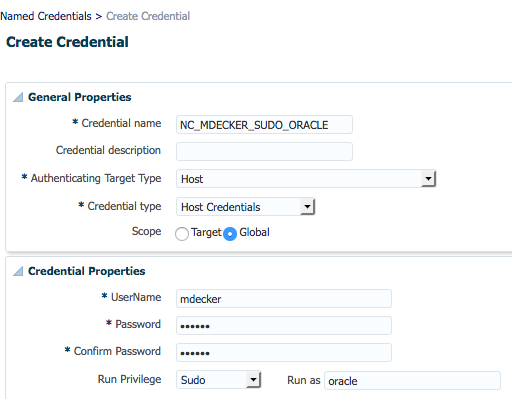
Here you provide your personalized credentials (username/password) and specify that sudo should be used to change to “oracle”.
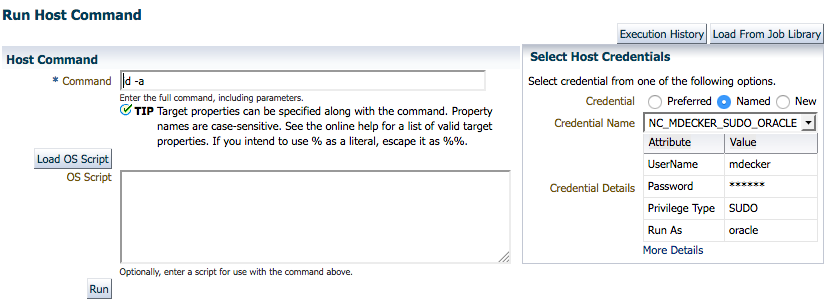
Go to “Targets” -> “Host” and click “Run Host Command”. Then give the command to run, e.g. “id -a”, and then add a named credential as well as a specific host and click “Run”.
If all is well, then you will get this output showing you the id of user oracle.
![]()
How does this work behind the scenes? The agent java process spawns a process “nmo”. This process was granted SETUID root Privileges by executing $ORACLE_HOME/root.sh at the time of agent deployment. This executable is calling “sudo” to run command “nmosudo” as user oracle with the “payload” command, which the user wanted to execute.
1 2 3 | root 14595 3149 0 14:23 pts/0 00:00:00 /u01/app/oracle/cloud/agent/sbin/nmo root 14598 14595 0 14:23 pts/1 00:00:00 /usr/bin/sudo -p ###AGENT-PDP-PASSWORD-PROMPT### -E -u oracle /u01/app/oracle/cloud/agent/sbin/nmosudo DEFAULT_PLUGIN DEFAULT_FUNCTIONALITY DEFAULT_SUBACTION DEFAULT_ACTION /bin/sh -c id -a oracle 14602 14598 0 14:23 pts/1 00:00:00 sleep 300 |
The linux logfile /var/log/secure will contain this messages. It can be seen that the personal user “mdecker” was running the command “nmosudo” with the payload command “id -a” as attribute.
1 | Sep 13 22:03:59 xxx sudo: mdecker : TTY=pts/2 ; PWD=/u01/app/oracle/cloud/agent/agent_inst/sysman/emd ; USER=oracle ; COMMAND=/u01/app/oracle/cloud/agent/sbin/nmosudo DEFAULT_PLUGIN DEFAULT_FUNCTIONALITY DEFAULT_SUBACTION DEFAULT_ACTION /bin/sh -c id -a |
